Configuration (Windows)
Configure ProxyBridge on Windows to route application traffic through InterceptSuite.
Configuration: Windows
Open ProxyBridge from the Start menu. Windows will show a UAC prompt: click Yes to grant the required administrator permissions. ProxyBridge requires administrator privileges to intercept network traffic at the kernel level.
Proxy Settings
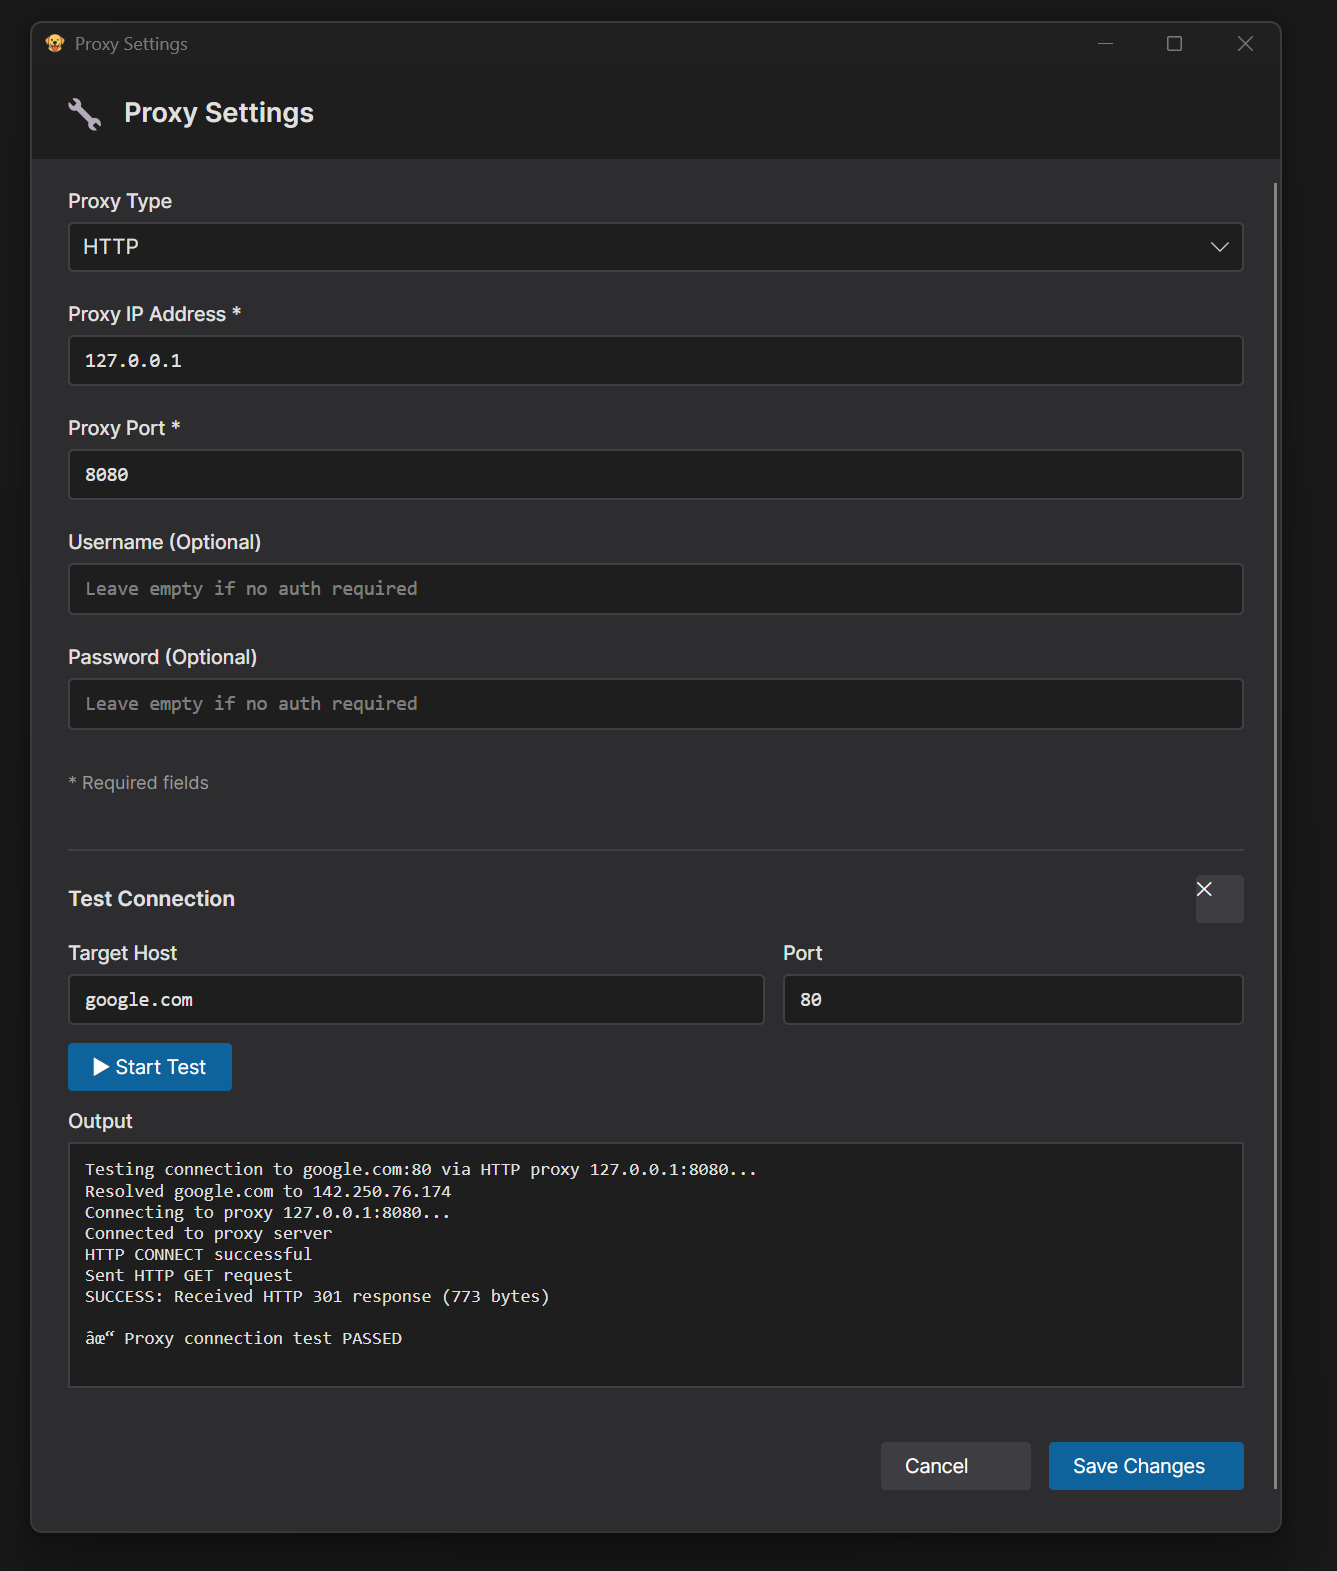
- Click the Proxy tab in the main window
- Click Proxy Settings from the menu
- Select Proxy Type:
SOCKS5orHTTP - Enter Proxy Host: supports both IP addresses and domain names:
- IP Address:
127.0.0.1,192.168.1.100 - Domain Name:
proxy.example.com,localhost
- IP Address:
- Enter Proxy Port (e.g.
4444for InterceptSuite,1080for SOCKS5,8080for HTTP) - (Optional) Enter Proxy Username and Proxy Password for authenticated proxies: HTTP Basic Auth and SOCKS5 authentication are both supported. Leave blank for local InterceptSuite use.
- Click Save Changes
Test Proxy Connection
- Click Test Proxy Connection button
- Enter Destination IP/Host (default:
google.com) - Enter Destination Port (default:
80) - Click Start Test to verify proxy connectivity: results appear in the output area
Multiple Proxy Configurations
ProxyBridge supports multiple proxy server configurations simultaneously. Each proxy rule can be assigned to a specific proxy configuration, allowing you to route different applications through different proxies at the same time.
- Add multiple proxy servers (SOCKS5 and HTTP, mixed) in Proxy Settings
- Each proxy entry gets a unique ID
- When creating a Proxy Rule, select which proxy configuration to route through via the Proxy Config selector
- If a rule's assigned proxy config is not found, ProxyBridge falls back to the first available configuration
Example use cases:
- Route
chrome.exethrough a SOCKS5 proxy andcurl.exethrough an HTTP proxy simultaneously - Test against multiple proxy endpoints without restarting
- Assign latency-sensitive apps to a local proxy and others to a remote one
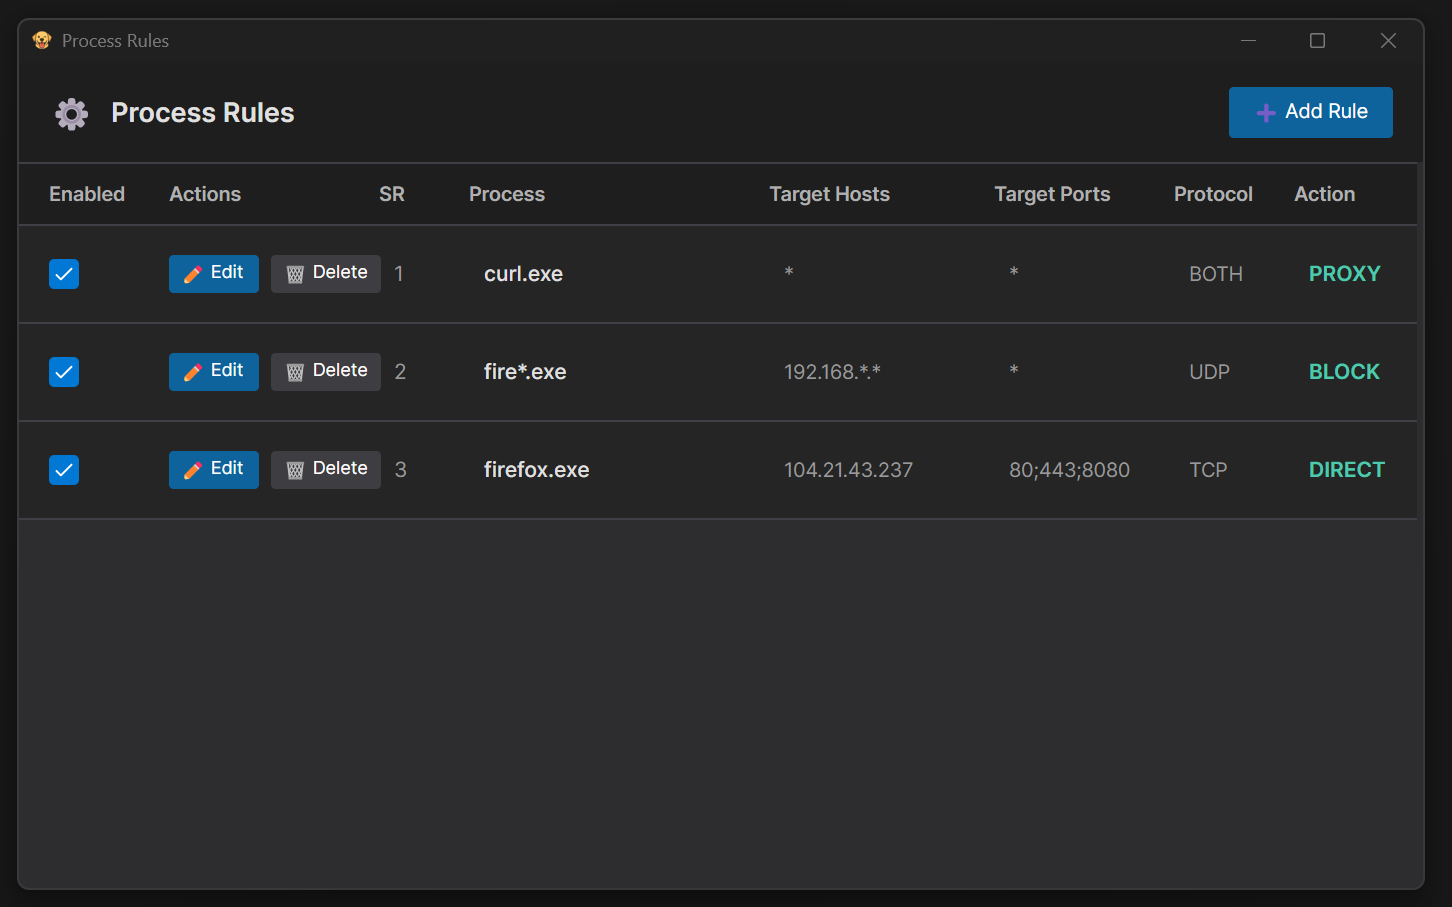
Proxy Rules
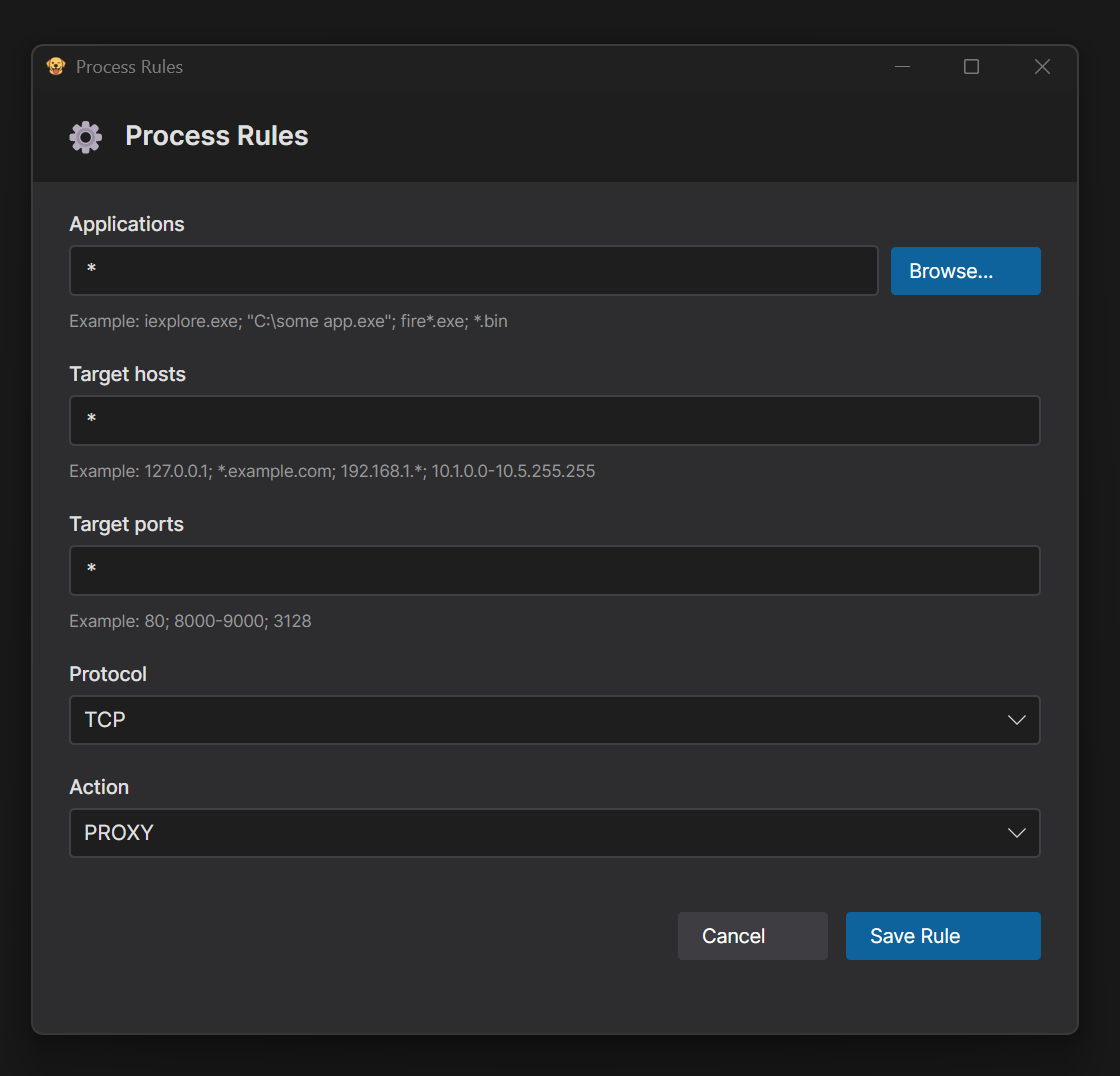
- Click the Proxy tab, then click Proxy Rules
- Click Add Rule
- Configure the rule fields:
Applications
| Format | Example |
|---|---|
| All processes | * |
| Single process | chrome.exe |
| Multiple processes (semicolon-separated) | firefox.exe; chrome.exe |
| Wildcard match (prefix, suffix, or anywhere) | steam*.exe, *.exe, *ch*, ch* |
| Browse button | select executable from disk |
Target Hosts (optional, leave empty or use * for all)
| Format | Example |
|---|---|
| Specific IP | 127.0.0.1 |
| Wildcard range | 192.168.*.* |
| Multiple IPs | 127.0.0.1; 192.168.1.1 |
| IP range | 10.10.1.1-10.10.255.255 |
| IPv6 exact | ::1, 2001:db8::1 |
| IPv6 CIDR | 2001:db8::/32, fe80::/10 |
| IPv6 range | 2001:db8::1-2001:db8::ff |
Target Ports (optional, leave empty or use * for all)
| Format | Example |
|---|---|
| Specific ports | 80; 8080 |
| Port range | 80-8000 |
Protocol: TCP, UDP, or Both (TCP + UDP)
Action
| Action | Behaviour |
|---|---|
DIRECT |
Allow direct internet access (available by default) |
BLOCK |
Block all internet access (available by default) |
PROXY (Configured Proxies) |
Route through a specific proxy configuration. A separate proxy option appears in the dropdown list for each proxy server you have added. |
- Click Save Rule
Rules are evaluated top-down: the first matching rule wins. Place more specific rules above broader ones.
Important: By default, the Action selection menu only shows DIRECT and BLOCK. To route traffic, you must configure at least one proxy server in Proxy Settings first. Once configured, your available proxy configurations will appear in the Action list. ProxyBridge on Windows supports multiple proxies, allowing you to assign a different proxy configuration to each rule.
Profile Management
ProxyBridge supports full configuration profiles. Instead of managing rules in isolation, you can save, switch, and export your entire setup (including proxy configurations, routing rules, localhost routing choices, and logging settings) as a profile.
Profiles allow you to maintain different configurations for different security testing, debugging, or networking scenarios and switch between them easily when required.
Using the Profile menu in the GUI, you can perform the following actions:
- Create Profile: Create a new blank or template profile.
- Select / Switch Profile: Instantly load and activate a different profile from your list.
- Export Profile: Save your current active profile to a
.pbprofileJSON file on disk. - Import Profile: Load a previously saved
.pbprofilefile into your local ProxyBridge client.
The .pbprofile format is cross-platform: profiles exported from Windows can be imported on macOS or Linux and vice versa.
Profile JSON Format:
{
  "Version": "1.0",
  "LocalhostViaProxy": false,
  "IsTrafficLoggingEnabled": true,
  "ProxyConfigs": [
    {
      "Id": 1,
      "Type": "socks5",
      "Host": "127.0.0.1",
      "Port": "1080",
      "Username": "",
      "Password": ""
    },
    {
      "Id": 2,
      "Type": "http",
      "Host": "127.0.0.1",
      "Port": "8080",
      "Username": "",
      "Password": ""
    }
  ],
  "ProxyRules": [
    {
      "ProcessName": "chrome.exe",
      "TargetHosts": "*",
      "TargetPorts": "*",
      "Protocol": "TCP",
      "Action": "PROXY",
      "IsEnabled": true,
      "ProxyConfigId": 1
    },
    {
      "ProcessName": "firefox.exe",
      "TargetHosts": "192.168.*.*",
      "TargetPorts": "80;443",
      "Protocol": "BOTH",
      "Action": "PROXY",
      "IsEnabled": true,
      "ProxyConfigId": 2
    }
  ]
}
Activity Monitoring
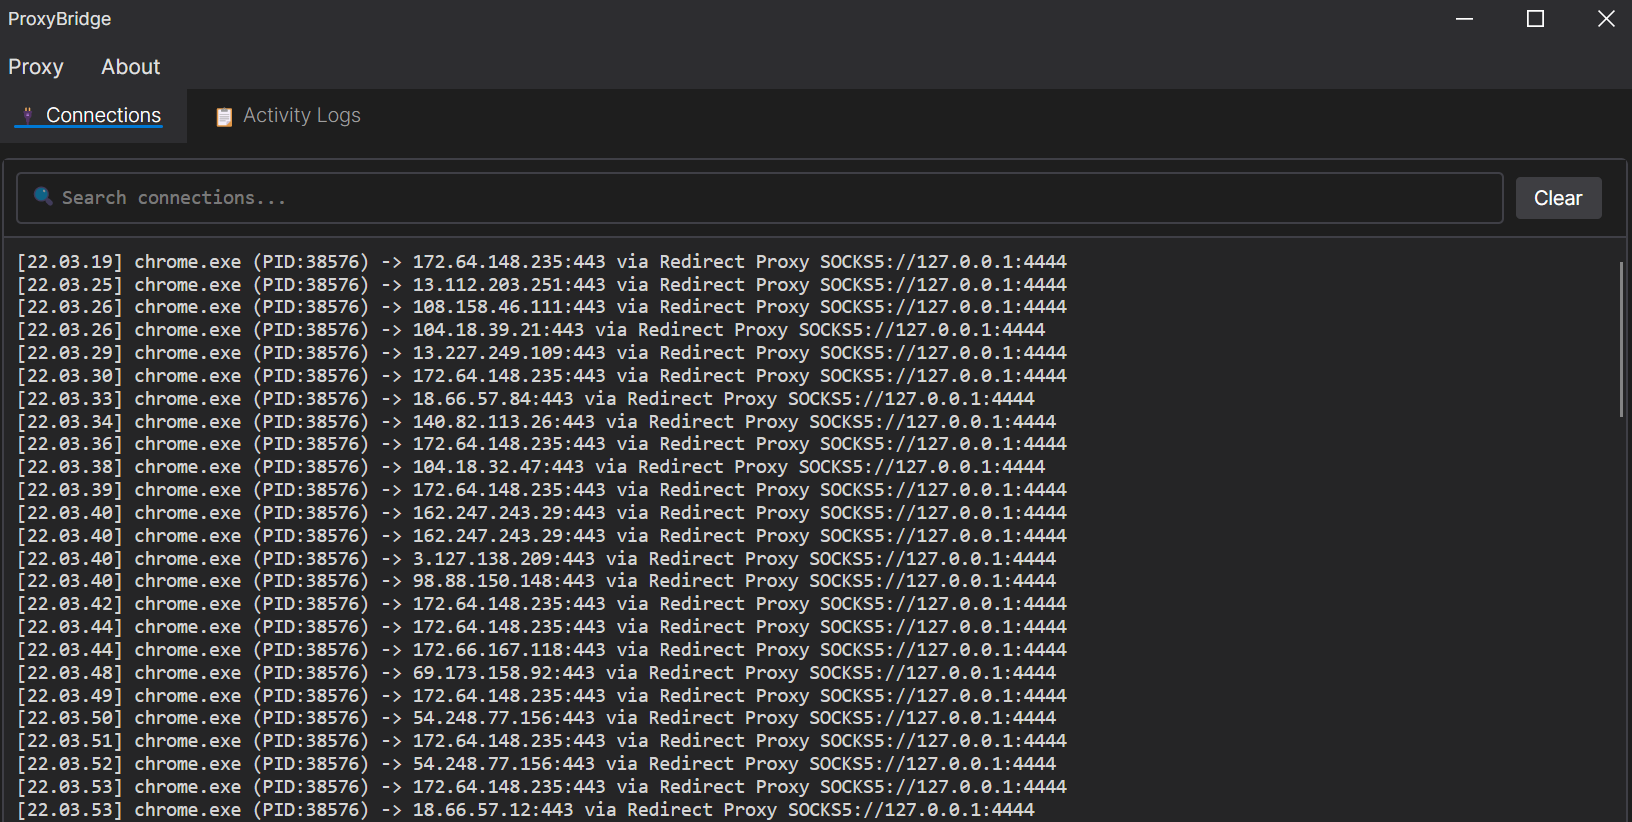
- View real-time connection activity in the Connections tab
- Monitor both TCP and UDP connections across all processes
- See whether each connection is routed as
PROXY,DIRECT, orBLOCK - Use the search box to filter connections
CLI
ProxyBridge_CLI.exe is a lightweight native command line interface that loads a .pbprofile exported from the GUI and runs ProxyBridge headlessly: no GUI required.
Basic Usage
Open Command Prompt as Administrator (right-click and choose Run as administrator), then run:
# Run a profile (requires Administrator)
ProxyBridge_CLI.exe --profile C:\Users\user\myconfig.pbprofile

# Run with connection logging
ProxyBridge_CLI.exe --profile myconfig.pbprofile --verbose 2

# Run with full log and connection output
ProxyBridge_CLI.exe --profile myconfig.pbprofile --verbose 3

# Check for updates (does not require Administrator)
ProxyBridge_CLI.exe --update

# Show version
ProxyBridge_CLI.exe --version

# Show help
ProxyBridge_CLI.exe --help
Command Line Options
Options:
  --profile <path>     Path to .pbprofile file exported from the GUI
                       Export from GUI: File > Export Profile

  --verbose <0-3>      Logging verbosity
                         0 - Silent (default)
                         1 - Log messages only
                         2 - Connection events only
                         3 - Both logs and connections

  --version            Show version information
  -?, -h, --help       Show help

Commands:
  --update             Check for updates and download latest installer from GitHub
                       (does not require Administrator)
Notes:
--profilerequires Administrator (WinDivert kernel driver).--updateand--versiondo not require Administrator.- Press
Ctrl+Cto stop ProxyBridge cleanly. - The CLI (
ProxyBridge_CLI.exe) andProxyBridgeCore.dllmust be in the same directory.
Things to Note
Localhost Traffic
Localhost traffic (127.0.0.0/8 and IPv6 ::1) bypasses proxy rules and goes direct by default. This is the recommended setting because most proxy servers reject localhost connections to prevent SSRF attacks, and many applications run local services on 127.0.0.1 that must stay on your machine (DevTools debugging, local dev servers, IPC).
Enable localhost proxying only when:
- The proxy is running on the same machine (e.g.
127.0.0.1:4444) - You are security testing and need to intercept localhost traffic in InterceptSuite/Burp Suite
GUI: Proxy menu -> Localhost via Proxy
CLI: Controlled via the LocalhostViaProxy field in the .pbprofile file.
Addresses That Always Go Direct
The following are automatically routed as direct regardless of rules (you can still BLOCK them with an explicit rule):
IPv4:
- Broadcast (
255.255.255.255andx.x.x.255) - Multicast (
224.0.0.0 to 239.255.255.255) - APIPA / link-local (
169.254.0.0/16) - DHCP ports (UDP 67, 68)
IPv6:
- Multicast (
FF00::/8): Replaces IPv4 broadcast entirely; includes DHCPv6 multicast (FF02::1:2), all-nodes (FF02::1), router solicitation, etc. - Link-local (
FE80::/10): Cannot be routed off-link; equivalent to IPv4 APIPA - Site-local (deprecated) (
FEC0::/10) - Unspecified (
::): Equivalent to IPv40.0.0.0 - DHCPv6 ports (UDP 546, 547)
You can still create rules with DIRECT or BLOCK actions targeting these addresses/ports, but PROXY is always overridden to DIRECT for them.
UDP Proxy Requirements
HTTP proxy + UDP = direct connection
HTTP proxy servers do not support UDP. If your configured proxy type is HTTP and you add a rule with Action PROXY and Protocol UDP or BOTH, ProxyBridge will not forward those UDP packets through the proxy: they will go direct instead. BLOCK and DIRECT UDP rules work regardless of proxy type.
SOCKS5 is required for UDP proxying, but is not sufficient on its own
Switching to a SOCKS5 proxy enables UDP forwarding in ProxyBridge, but whether UDP traffic actually reaches the destination depends entirely on whether the SOCKS5 proxy server supports the UDP ASSOCIATE command. Most SOCKS5 proxy servers on the market, including SSH dynamic port forwarding (ssh -D), do not implement UDP ASSOCIATE. If ProxyBridge forwards a UDP packet to a SOCKS5 proxy that doesn't support it, the proxy will drop the packet.
Only add UDP PROXY rules if you have confirmed your SOCKS5 proxy server supports UDP ASSOCIATE.
QUIC and HTTP/3
Even with a SOCKS5 proxy that supports UDP ASSOCIATE, many modern applications and websites may still not work correctly over UDP proxy. Most major websites and CDNs now support HTTP/3, which runs over QUIC: a UDP-based protocol. Routing QUIC traffic through a SOCKS5 proxy requires the proxy server to understand and handle QUIC and HTTP/3 specifically, not just raw UDP. A proxy that supports UDP ASSOCIATE at the SOCKS5 level does not automatically gain HTTP/3 or QUIC support.
In practice, unless your SOCKS5 proxy explicitly supports HTTP/3 and QUIC proxying, routing UDP to it may work for simple UDP applications but will likely fail or degrade for traffic to modern CDN-backed websites.
Testing UDP and HTTP/3 support
If you want to test ProxyBridge's UDP proxying including HTTP/3 and QUIC, Nexus Proxy is a SOCKS5 proxy server built by InterceptSuite specifically for this purpose. It supports UDP ASSOCIATE along with HTTP/3 and QUIC handling.
IPv6 Support
ProxyBridge fully supports IPv6 traffic interception and routing for both TCP and UDP. IPv6 rules use the same format as IPv4 with additional notation:
- Exact address:
::1,2001:db8::1 - CIDR:
2001:db8::/32,fe80::/10 - Range:
2001:db8::1-2001:db8::ff - Wildcard
*matches all IPv4 and IPv6 addresses.
Multiple Proxy Configurations
Up to 16 proxy server configurations can be active simultaneously. Rules can each be assigned to a specific proxy config. If the assigned config is not found, ProxyBridge falls back to the first available config. This allows routing different apps through different proxies without any application-side configuration.